In this post I will guide you how to integrate Facebook social login into your Laravel 4 application. You will learn quite a bit about this integration:
- How to get and install Facebook PHP SDK into your Laravel project
- How to create and configure a Facebook application that will be used for social sign-in
- How to connect Facebook with Laravel and pass data from a Facebook profile to your application and consequently how to store it in the database
- How to use the Facebook profile for creation of account in a Laravel application and sign in with Facebook after the account is created
I chose to use plain and official Facebook SDK instead of do-it-all packages like Opauth and HybridAuth because it is the most current and in my opinion the easiest to get started with.
You can get the full source code for this application on Github: https://github.com/msurguy/laravel-facebook-login
And a demo : http://demos.maxoffsky.com/facebook-login
The flow of the demo application is as follows:
1) User clicks on “Sign In with Facebook” on the login page of the application, Facebook authorization prompts the user to grant permissions
2) After user’s permission approval, user is redirected back to the Laravel application and user’s data is passed to the application
3) Using the user’s data, a new profile entry and a new user entry is created in the application’s database if the profile for this user does not exist yet in the system.
To achieve this, we need to install Facebook SDK, create a new Facebook application on Facebook developers site, store application’s settings in a separate file, create migrations for the database and finally connect all of this together in the application’s routes. Sounds like quite a bit of work but little by little we will get there.
Are you ready to learn? Let’s get started!
Installing Facebook PHP SDK:
You can skip this step if you already have a Laravel application but I will start by creating a clean Laravel project using the Composer command:
composer create-project laravel/laravel laravel-facebook-login --prefer-distThen CD into the application folder:
cd laravel-facebook-login/Now let’s tell Composer to download Facebook SDK package and add it to composer.json file by executing this command:
composer require facebook/php-sdkAt the prompt that will ask you for the desired version constraint for this package, make sure to type “dev-master” (without the quotation marks).
Facebook SDK will be downloaded and an entry to this package will be added to composer.json file.
After Facebook SDK is magically downloaded and put into your “vendor” folder by Composer, you can already use it in the Laravel application but first let’s create and configure a new Facebook application.
Creating a new Facebook application:
If you already have a Facebook account, go to https://developers.facebook.com/apps and create a new application.
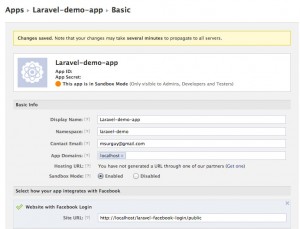
The thing about Facebook apps is that there is no way (at least I haven’t found it) to have two separate configs for testing and production so you must use the localhost settings to allow you to test and when the application is on production you will have to switch the site URL to the live site. Click the image to see the screenshot of my settings (with App ID and secret erased):
Copy the app ID and secret as you will need them in the next step.
Creating a config file for Facebook:
Even though this step is completely optional, I decided to include it to make my code a bit cleaner. I created a file that stores my app id and secret in the “app/config” folder and called it “facebook.php”:
<?php
// app/config/facebook.php

// Facebook app Config
return array(
        'appId' => 'my-app-id',
        'secret' => 'my-app-secret'
    );
Make sure to replace my fake values with your app’s real id and secret.
Creating migration and data models for users and social profiles:
Now that we have Facebook SDK configured and ready to use, let’s define a structure for the data that will be saved from Facebook. The application will have two tables that will be used for saving and managing our user profiles and data passed from the social provider (Facebook).
First table will be called “users” and it will store the email, password, name and other data of the regular users that will sign up through a form on the site instead of signing up with Facebook.
The second table called “profiles” will be used to store social sign in tokens for the users and metadata passed from Facebook (and in the future possibly from other providers too).
The “users” table will have many-to-one relationship with the “profiles” table so that each user can sign up with many providers if needed.
Let’s run the following Artisan commands to create the migration templates for these two tables:
php artisan migrate:make create_users_table
php artisan migrate:make create_profiles_table
And now let’s edit these migrations, open up the “create_users_table” migration in “app/database/migrations” erase its contents and put the following migration:
<?php

use IlluminateDatabaseMigrationsMigration;

class CreateUsersTable extends Migration {

    public function up()
    {
        Schema::create('users', function($table)
        {
            $table->increments('id');
            $table->string('email')->unique();
            $table->string('photo');
            $table->string('name');
            $table->string('password');
            $table->timestamps();
        });
    }

    public function down()
    {
        Schema::drop('users');
    }

}
Save it, then open up “create_profiles_table” migration and edit it to look like this:
<?php
use IlluminateDatabaseMigrationsMigration;

class CreateProfilesTable extends Migration {

    public function up()
    {
        Schema::create('profiles', function($table)
        {
            $table->increments('id');
            $table->integer('user_id')->unsigned();
            $table->string('username');
            $table->biginteger('uid')->unsigned();
            $table->string('access_token');
            $table->string('access_token_secret');
            $table->timestamps();
        });
    }

    public function down()
    {
        Schema::drop('profiles');
    }

}
After these migrations are edited, run the migrations by executing “php artisan migrate” command (make sure you create a DB on your system first and provide the connection settings for it in app/config/database.php file).
This should create the tables necessary for the application to save the new user accounts and linking the social profiles to the newly created accounts.
Let’s build the models for these new tables. Create a file called “Profile.php” and place it into “app/models”, with the following contents that will create the inverse of the one to many relationship between the users and profiles:
<?php

class Profile extends Eloquent {

    public function user()
    {
        return $this->belongsTo('User');
    }
}
And add the one to many relationship to profiles into the “User.php” model:
...
    public function profiles()
    {
        return $this->hasMany('Profile');
    }
...
Next step is to actually build up the logic for the application.
Creating the routing logic for the application
The part will be the last but perhaps the most important, where all the things we just did will culminate and result in a functional application with Facebook login.
The code that follows will be put in “app/routes.php” so open it up and roll up your sleeves, it’s gonna get dirty!
First, we want to create new route called “login/fb” that will use the Facebook SDK to redirect the user to a Facebook Auth page where the user can grant permissions for Facebook to pass in the email address and other data back to the application:
Route::get('login/fb', function() {
    $facebook = new Facebook(Config::get('facebook'));
    $params = array(
        'redirect_uri' => url('/login/fb/callback'),
        'scope' => 'email',
    );
    return Redirect::to($facebook->getLoginUrl($params));
});NOTE: in Laravel 4.19 the Redirect::to method has been replaced with Redirect::away();
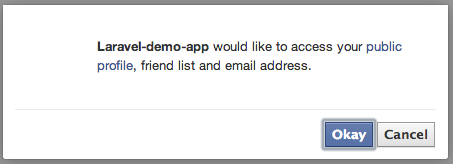
When you access this route, it will show a dialog like in the screenshot:
Upon approval, the user will be redirected to “login/fb/callback” route that we have yet to create :
Route::get('login/fb/callback', function() {
    $code = Input::get('code');
    if (strlen($code) == 0) return Redirect::to('/')->with('message', 'There was an error communicating with Facebook');

    $facebook = new Facebook(Config::get('facebook'));
    $uid = $facebook->getUser();

    if ($uid == 0) return Redirect::to('/')->with('message', 'There was an error');

    $me = $facebook->api('/me');

    dd($me);
});
Now when you try going to “login/fb” again, you should see a screen full of your profile data. If you are getting to this point then all that’s left to do is make this data work to create a profile in your application.
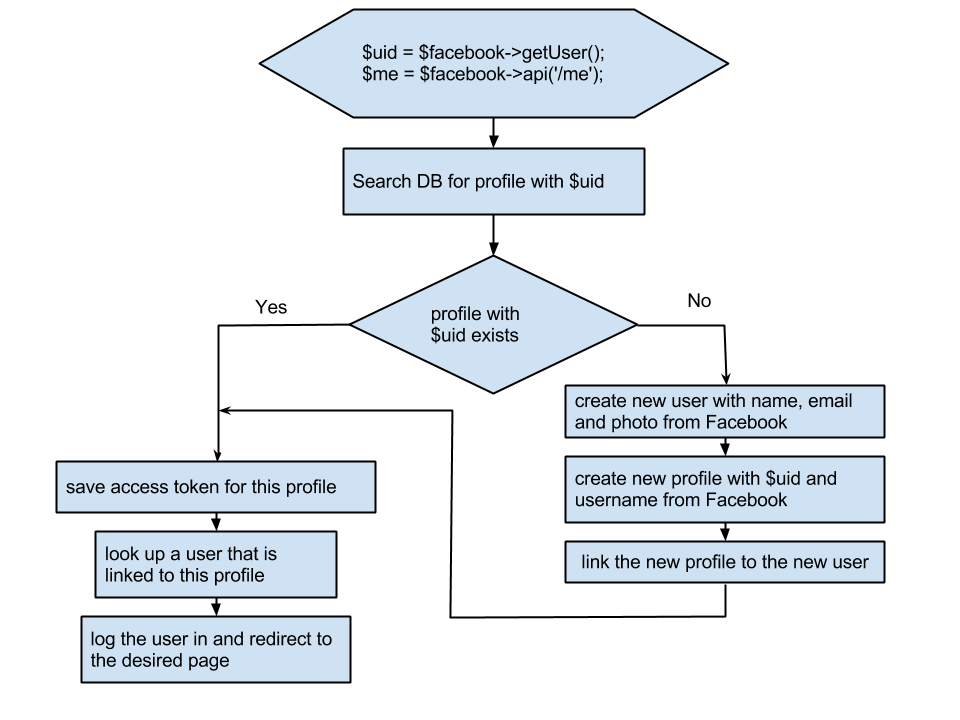
I have created a flow chart that describes how the process will go from here:
And the final implementation for this route looks like this :
Route::get('login/fb/callback', function() {
    $code = Input::get('code');
    if (strlen($code) == 0) return Redirect::to('/')->with('message', 'There was an error communicating with Facebook');

    $facebook = new Facebook(Config::get('facebook'));
    $uid = $facebook->getUser();

    if ($uid == 0) return Redirect::to('/')->with('message', 'There was an error');

    $me = $facebook->api('/me');

    $profile = Profile::whereUid($uid)->first();
    if (empty($profile)) {

        $user = new User;
        $user->name = $me['first_name'].' '.$me['last_name'];
        $user->email = $me['email'];
        $user->photo = 'https://graph.facebook.com/'.$me['username'].'/picture?type=large';

        $user->save();

        $profile = new Profile();
        $profile->uid = $uid;
        $profile->username = $me['username'];
        $profile = $user->profiles()->save($profile);
    }

    $profile->access_token = $facebook->getAccessToken();
    $profile->save();

    $user = $profile->user;

    Auth::login($user);

    return Redirect::to('/')->with('message', 'Logged in with Facebook');
});
Try going to “login/fb” route and now you if everything goes well, the new profile will be created, saved into the DB and you will get an error stating that you don’t have an index route defined (route for “/”), so let’s create that route and the route for the logout:
Route::get('/', function()
{
    $data = array();

    if (Auth::check()) {
        $data = Auth::user();
    }
    return View::make('user', array('data'=>$data));
});

Route::get('logout', function() {
    Auth::logout();
    return Redirect::to('/');
});
And finally, let’s create that view in “app/views/user.blade.php”:
@if(Session::has('message'))
    {{ Session::get('message')}}
@endif
<br>
@if (!empty($data))
    Hello, {{{ $data['name'] }}}
    <img src="{{ $data['photo']}}">
    <br>
    Your email is {{ $data['email']}}
    <br>
    <a href="logout">Logout</a>
@else
    Hi! Would you like to <a href="login/fb">Login with Facebook</a>?
@endif
So now when you go to the index page and the user is not logged in, they will be prompted to login with Facebook, and when they do login a new account will be created if they haven’t logged in before, or the existing account will be looked up based on uid retrieved from Facebook Auth and the user possessing that uid will be logged in using Laravel’s Auth::login method.
That’s it there is to the Facebook login and account creation! The complete source code for an application implementing this social login will be posted shortly. Let me know if this is helpful or if you have questions and spread the word about my blog!


